Note-taking is one of the most important ways to store and retain information that you might need. Whether it’s for school, work or simply to remember something important, notes help you focus on the key details and ignore irrelevant information.
However, taking notes the old way – with pen and paper – isn’t always a great solution. You want to access your notes across all your devices, or simply write faster using a keyboard.
Dedicated note-taking apps are big business nowadays, and offer extra features that simply aren’t possible when note-taking manually. Microsoft’s OneNote is certainly up there, combining ease of use with a powerful range of functionality.
Here’s everything you need to know about OneNote, including how to make the most out of it.
What is OneNote?
In simple terms, OneNote is Microsoft’s dedicated notes app.
It’s one of the company’s core Office apps, and is available within Microsoft 365. However, unlike Word, Excel, PowerPoint and many others, you don’t need to pay for a subscription to use it.
OneNote is completely free, and there’s not even an option to pay for it (unless you need lots of cloud storage). It’s a fully-featured app in its own right.
Why you should use OneNote
While some note-taking apps might be even more feature-rich than OneNote, Microsoft’s app strikes a great balance between ease of use, features and cross-device compatibility.
OneNote is missing some features, but the ones which are there are easy to discover and use. Probably the most important of these are integration with the Outlook email client and OneDrive cloud storage. If you want to take notes during your Teams meeting or create a list based on email, it’s a great choice.
And unlike some note-taking apps, OneNote is available across all your devices. That includes Windows (10 and 11), Mac, Android, iOS and even ChromeOS (via the web).
OneNote is also a great app if you really need to have access to your files and notes everywhere you are. It allows you to synchronise all your notebooks to the cloud, so they are readily available everywhere you go.
This relies on the internet, but you can still use OneNote while offline. Any changes you make will be saved, then uploaded to the cloud when you connect to the internet again.
Best OneNote features
Here are 10 of the best OneNote features that are worth using:
1. Basic layout and functionality
Adrian Sobolewski-Kiwerski / Foundry
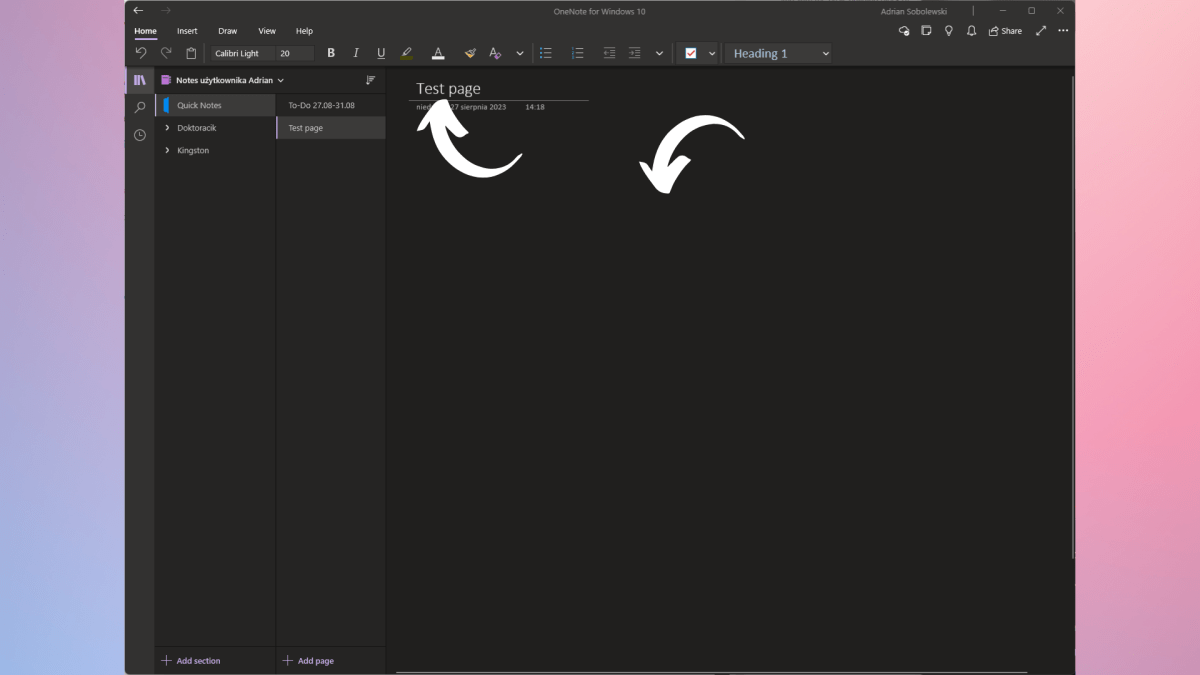
First, let’s start with the basics. The space where you’ll be writing in OneNote is called a page. At the top, you’ll see an underlined empty space, which is there for the title of that page. Below that you’ll see the time and date of this page’s creation.
Below the date is the page itself – this is your workspace in OneNote. You can immediately see that it is not the same as text editors such as MS Word. You don’t have set lines here, and the text does not start to the left of the page by default. You’re free to start writing anywhere in this space – just click in the middle of the page and start writing there, finish one sentence, and click to the right to start another one there.
This helps you create more free-form notes, which is even better once you start inserting other content into your text. This means that it is extremely easy to create charts, mind-maps and other different kinds of creative notes – not just text!
2. Use notebooks, sections, and pages
Adrian Sobolewski-Kiwerski / Foundry
Now let’s take a look at your basic navigation in OneNote. As a note-taking app, Microsoft’s software takes after real-life notebooks.
The basic structure of the app is the ability to add your notebooks, which are then divided into sections and later pages. This makes it easy to divide everything you need between specific notebooks and keep them all in separate sections and pages.
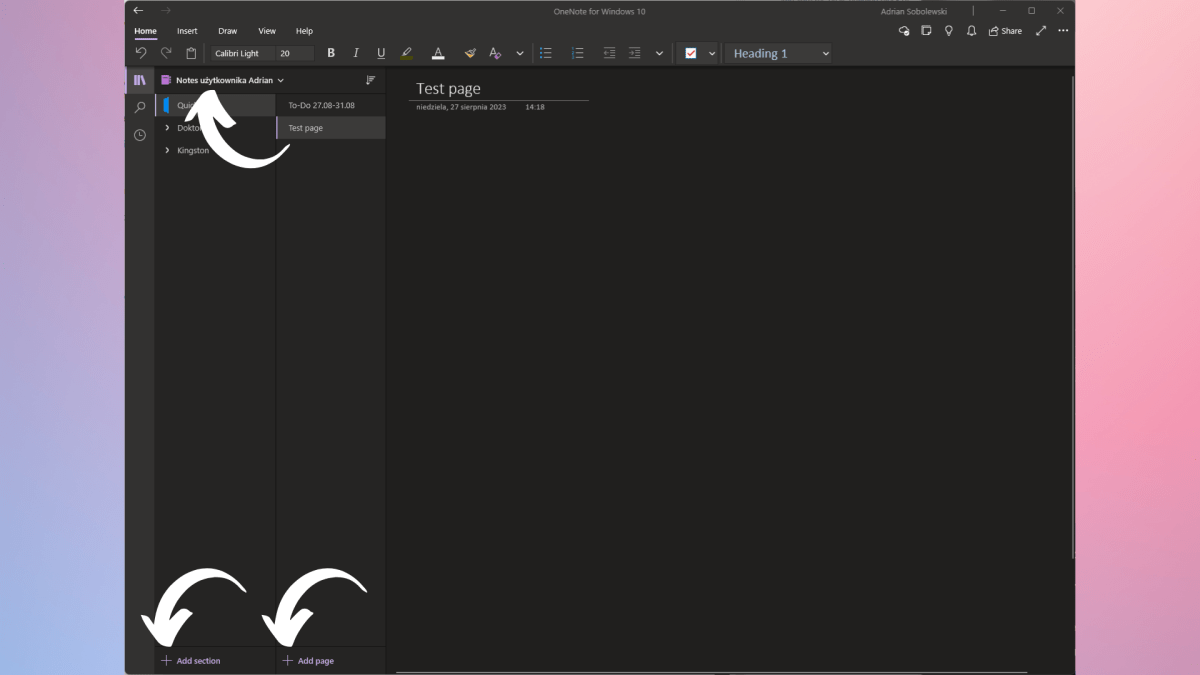
On the left of your OneNote window, you’ll see two columns. The left one houses your sections, while the right one houses pages inside the selected section. It’s here that you navigate inside your selected notebook.
If you want to select another notebook, you can click the name of your notebook in the panel above these two columns and change another one there. If you want to add a section or a page, you can either do that by right-clicking inside a column that you want or just clicking on the Add section/Add page button at the bottom of each column.
3. Create to-do lists (and add tags)
Adrian Sobolewski-Kiwerski / Foundry
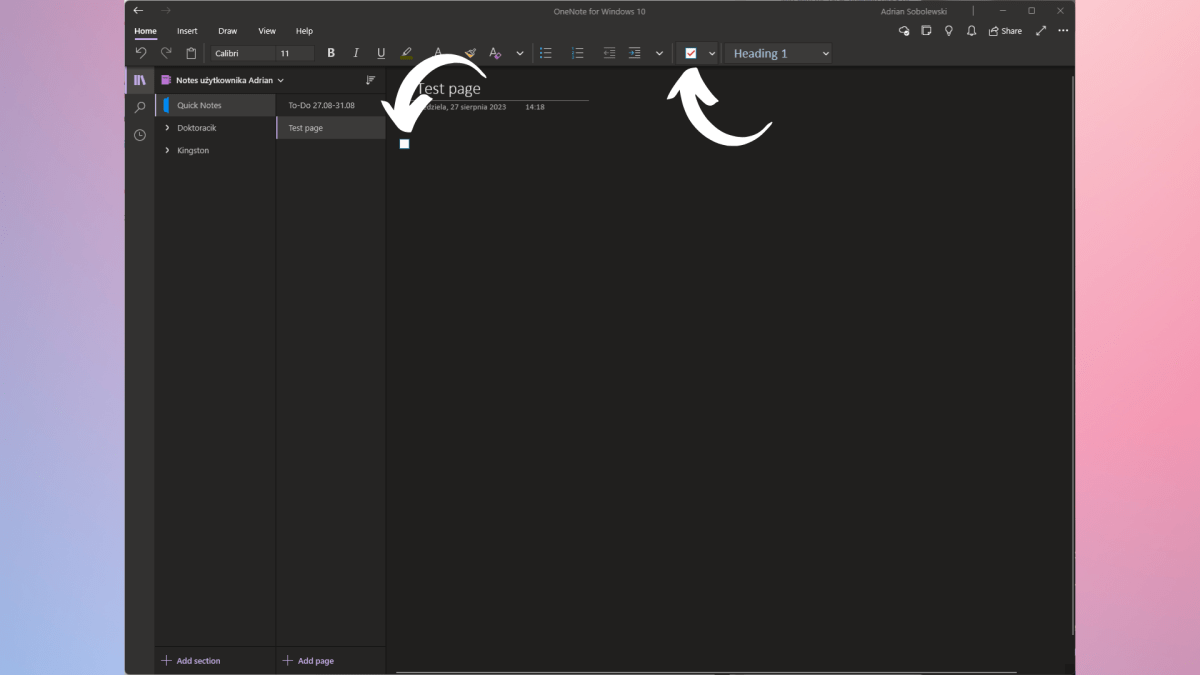
Now let’s check out the first features that will help you with your workload – creating a to-do list. In the Home panel, you can quickly make one by clicking the checkbox icon. This will create a to-do window on your selected page, which you can easily edit and move around inside the page.
In the toolbar, you should see a small down arrow just to the right of the checkbox icon. Click it, then choose which of the other tags you’d like to add to your page. There are a few preset options, but you can add your own and search using these.
4. Adding content to your notes
Adrian Sobolewski-Kiwerski / Foundry
Taking high-quality, easily digestible notes does not consist only of writing. Microsoft is aware of this, as OneNote offers a very wide range of add-ons that you can include in your notes.
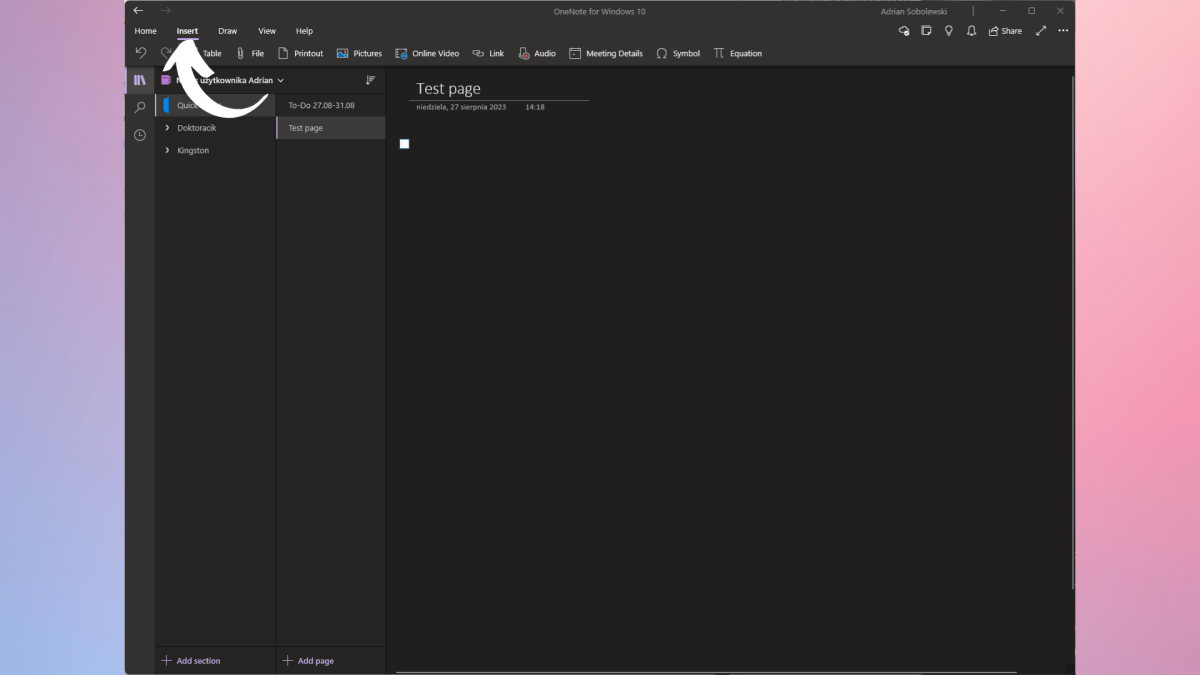
To start adding content to your page, navigate to the Insert tab at the top of the window. Once there, you’ll be able to attach quite a few different file formats and embed them into notes. Of course, there are pictures, but you can also live-record audio files and even add PDFs into your notebooks.
5. Add meetings from Outlook
Adrian Sobolewski-Kiwerski / Foundry
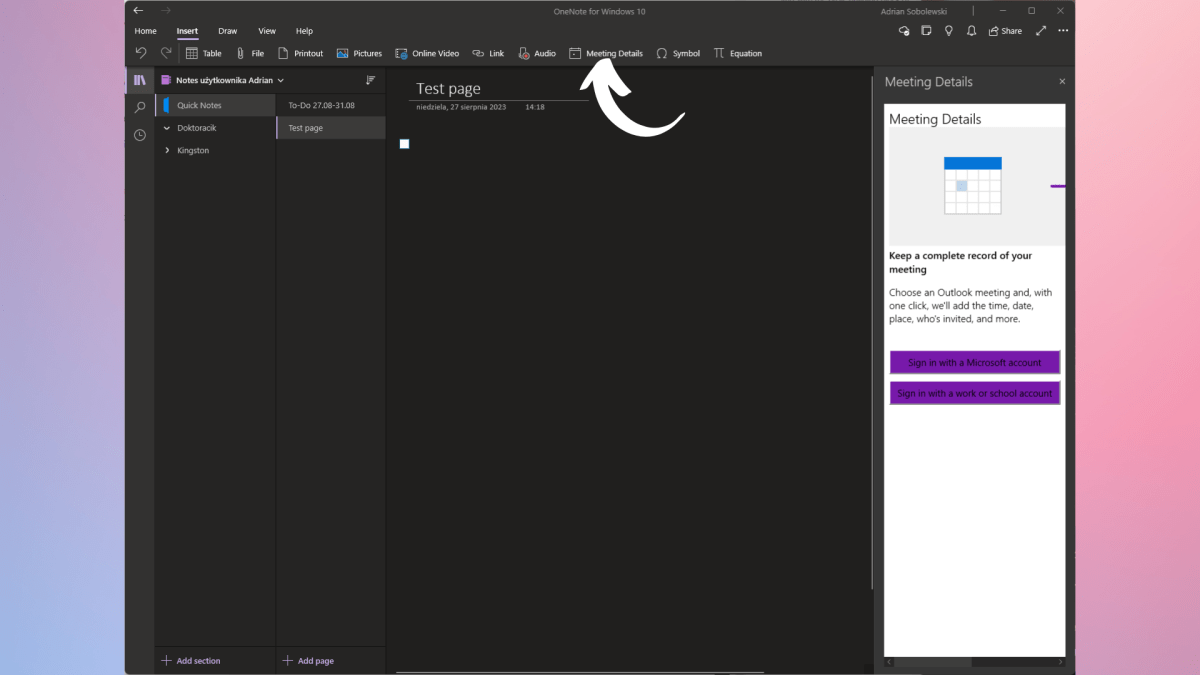
Within the Insert tab, there is another important feature – Outlook integration. When you click Meeting details, you can sign in with your Microsoft
your Microsoft account into OneNote, which later will be able to upload details of your meeting from your email. This helps you keep your meeting notes organised, and automatically titles them and adds metadata such as the time of the meeting, as well as invited guests.
Integrating OneNote with your Outlook will also allow you to quickly send your notes through your email, which is a great help for students who share notes.
6. Drawing options
Adrian Sobolewski-Kiwerski / Foundry
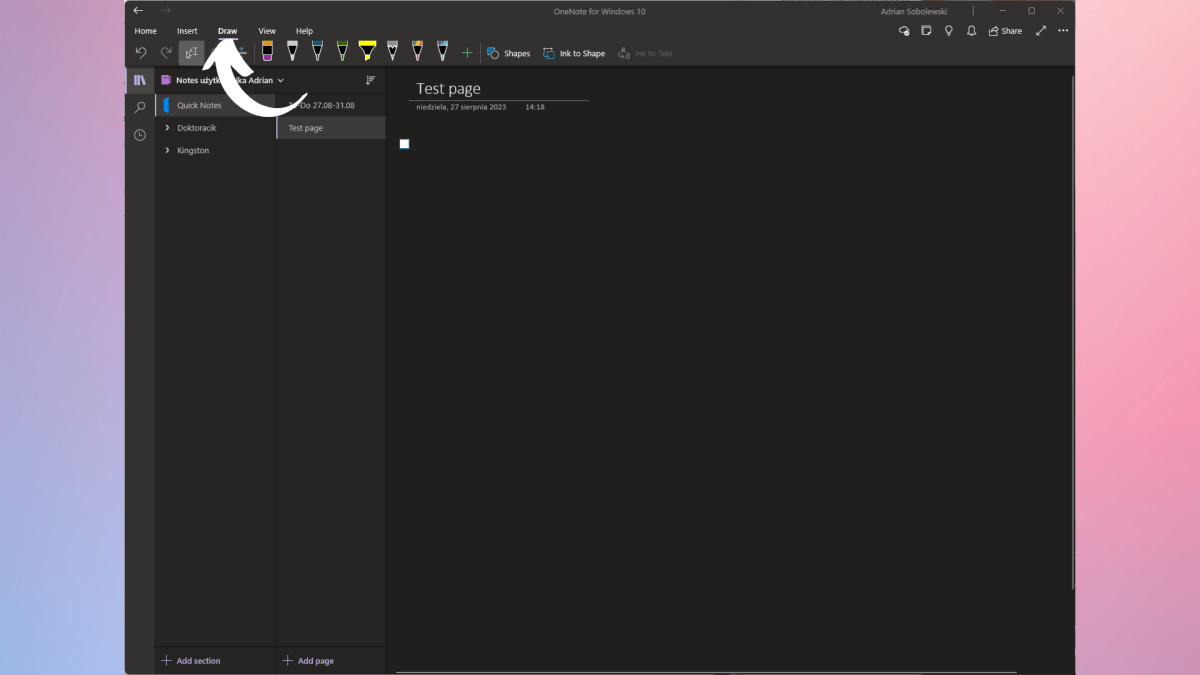
Microsoft has another ace up its sleeve – drawing and pen support.
That’s a great tool for artists, but also students who need to add complicated equations or geometric figures into their notes – sometimes it’s much easier to just draw them than to attempt to find the correct signs on your keyboard. Of course, if you just want to doodle, it’s a great way to do that too.
7. Change the design
Adrian Sobolewski-Kiwerski / Foundry
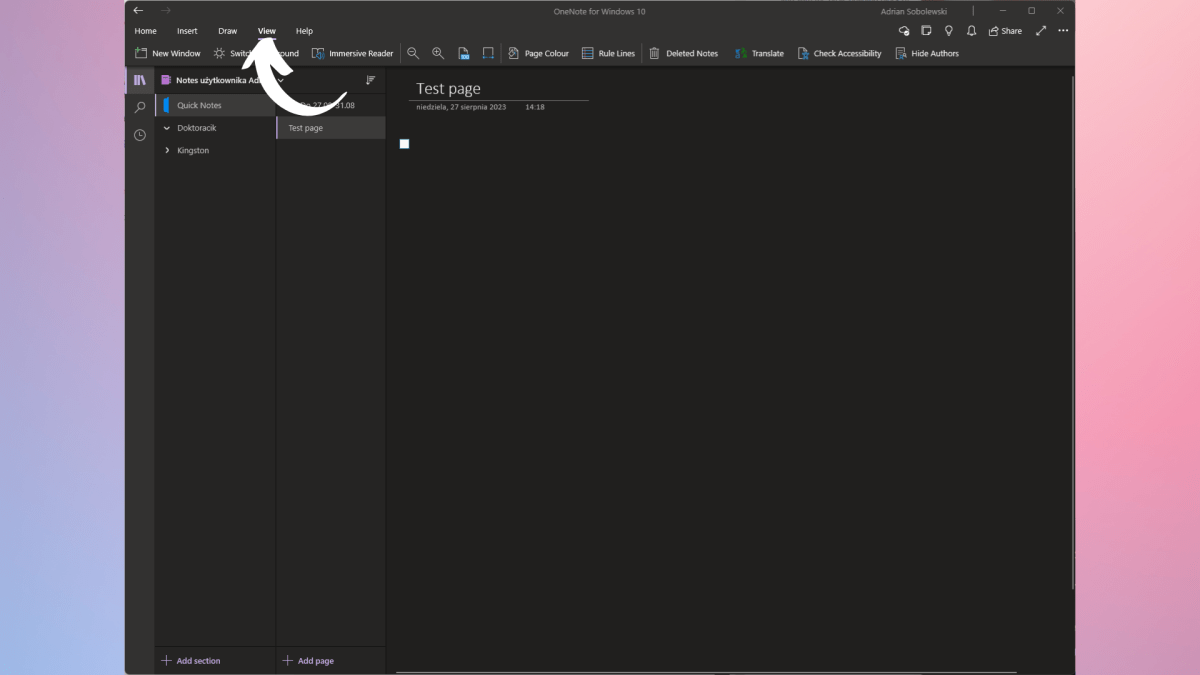
When you click the View tab in the upper menu, you’ll see various possibilities that Outlook gives you when it comes to your workspace. Sometimes the black, blank slate that you get out of the box might not be to your liking – here, you can change it.
You can easily change the colour of your sheet, as well as add lines, margins and other stylistic options. You can also turn on reader mode if you’re here to read what you’ve written before.
8. Sync your notes to cloud
Adrian Sobolewski-Kiwerski / Foundry
Storing your notes in only one place is not a very good idea. Whether sensitive work documents or important school materials, you don’t want to lose your files if something happens to your computer.
That’s why OneNote gives you the ability to store your notebooks in the cloud, meaning they’re accessible everywhere through the internet.
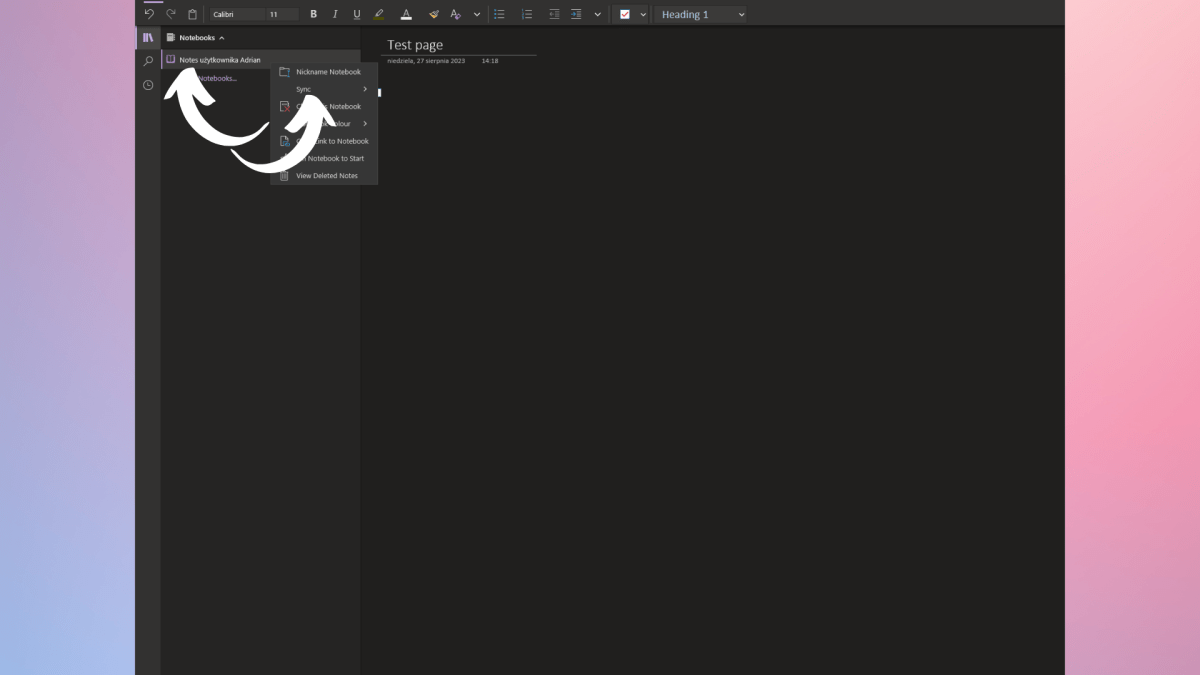
To start syncing your notebooks, you’ll first have to go to your notebooks menu. Once there, choose the notebook(s) that you want to sync to the cloud and right-click on them. Once you get the pop-up menu, simply click on the Sync option. There you’ll be asked whether you want to sync just the selected notebook or all of your notebooks. Choose the option that fits your needs.
9. Share your notebooks with others
Adrian Sobolewski-Kiwerski / Foundry
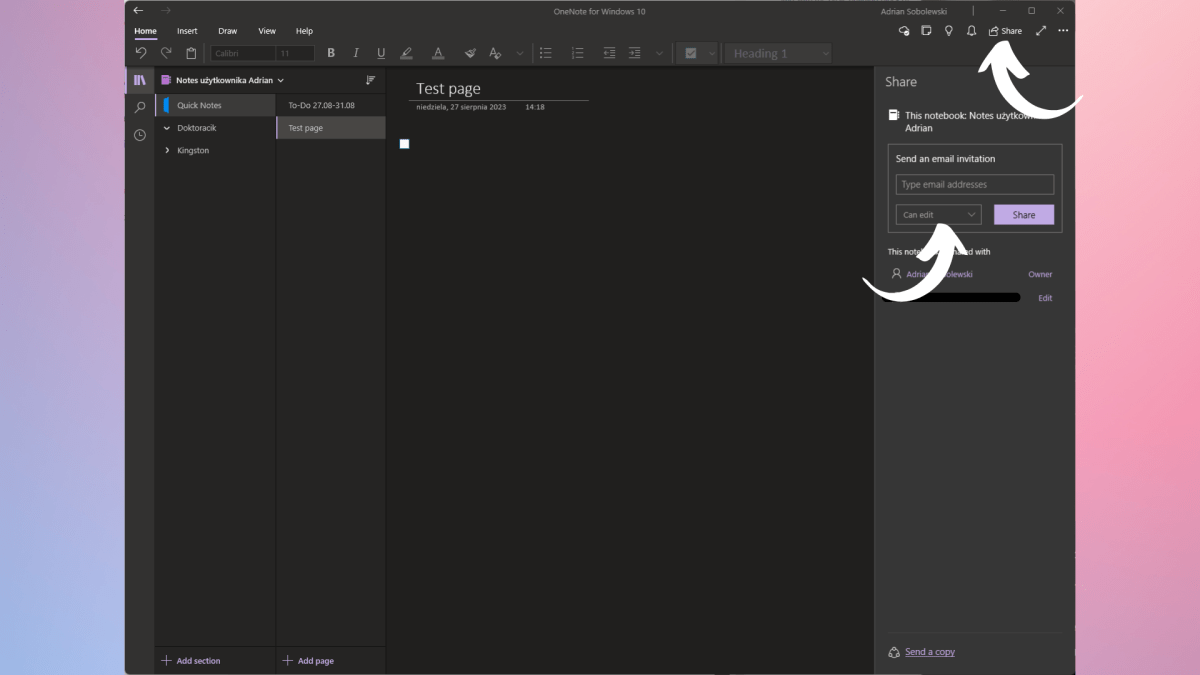
You don’t always want to make notes by yourself. Whether at work or in school, collaborating on your notes is a great way to make them even better. OneNote lets you share a notebook with as many other people as you’d like.
To do so, you’ll first have to sync it to the cloud. Then, click the share icon in the upper right corner. Once the pop-up menu appears, write down the email of a person that you want to add as a collaborator to your notebook and give them privileges – it can be either read-only mode, or read and edit mode. Click share, then the recipient will get an email notifying them of the shared document.
10. Password protect your notes
Adrian Sobolewski-Kiwerski / Foundry
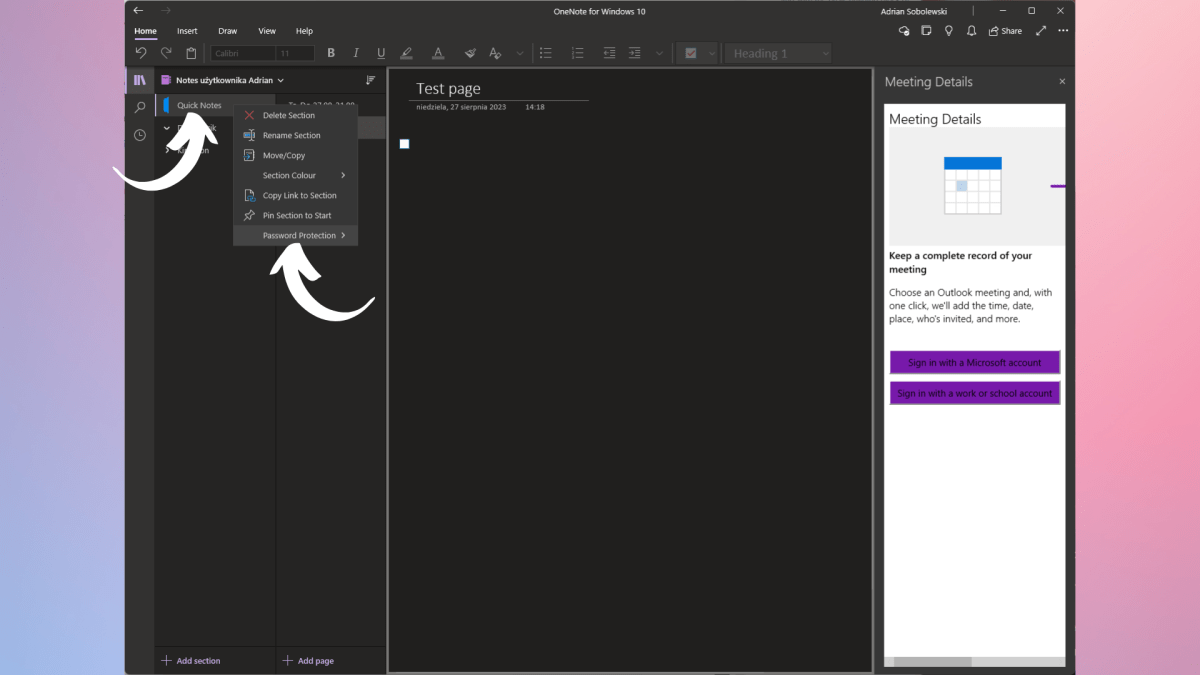
Even if you’re syncing your notebook to the cloud or working on them with a friend or colleague, sometimes you also need a little bit of privacy in your notes. That’s where the password feature comes in handy.
You can password-protect your sections, which allows you to keep your notebooks open, but still keep some parts of them protected against unwanted eyes. It’s an extremely easy feature to turn on – just right-click on the section that you want to protect with a password and choose the Password Protection option at the bottom of the list. Now click on Add Password and set your password for the section.
